In this article, I explain the topics that are necessary to learn in order to master docker.
1. Which problem is docker solving? Link to heading
“It works on my machine” is a thing of the past!
Example:
A Node.js application runs locally (on a laptop) with Node v14.4.0, but the production server is running Node v16.16.0.
Result:
The application runs perfectly on the laptop but not on the server!
Docker’s solution:
Docker solves this problem by packaging the application together with its entire environment (dependencies, configurations, etc.) into a container. This container runs exactly the same everywhere Docker is installed! With Docker, an application runs the same way on Local-, Development-, Testing-, and Production-Environment!
Summary:
- With Docker, making apps work the same everywhere
- Docker packages everything an application needs
2. Public images and repository Link to heading
Almost every major software service already has a docker image. These images can be found in repositories (e.g. DockerHub). DockerHub is like GitHub (except it hosts container images instead of code). Everyone can pull those images and use them in their applications without the need of configuring everything.
With the docker run command, for example, you can have a running MySQL database within seconds (regardless of the development environment).
3. Basic Docker Commands Link to heading
Pull an image from DockerHub:
docker pull nginx
Run a container from an image:
docker run nginx
Run a container and assign a custom name to the container:
docker run --name hello nginx
Run a container from an image in detached mode (starts the container in the “background” -> terminal is not blocked):
docker run -d nginx
Run a container from an image in detached mode with configured port-forwarding:
- host-port: 8080
- container-port: 80
docker run -d -p 8080:80 nginx
When creating a container image, the EXPOSE instruction is used to indicate the packaged application will use the specified port. These ports aren’t published by default. With the -P flag, you can automatically publish all exposed ports to ephemeral ports.For example, the following command will publish all of the exposed ports configured in the Dockerfile:
docker run -P nginx
If you run docker run -P, then Docker will publish all exposed container ports on to random host ports.
List running containers:
docker ps
Show the disk usage by container:
docker ps -s
Show only the container-ids:
docker ps -q
Lists all running and not running containers (= a list of running and stopped containers)
docker ps -a
Stop a running container:
docker stop [container-id]
For example:
docker stop a3f2c9d8b7e1
Btw. if there is only one container which has an id that starts with “a”, then you could also run the command with the beginning of the container-id:
docker stop a
Starts a stopped container again:
docker start [container-id]
Restarts a container:
docker restart [container-id]
Kills one or more containers. Sends SIGKILL to main process inside the container:
docker kill [container-id]
Remove a container:
docker rm [container-id]
-f means “force” in this case. It tells Docker to ignore restrictions and do the action anyway. This stops the container if it’s running and then remove it immediately without requiring it to be stopped first:
docker rm -f [container-id]
This deletes every container on your docker system (running containers + stopped containers):
docker rm -f $(docker ps -qa)
List all the existing images on your local machine:
docker images
Delete an image from your local machine:
docker image rm [image-id]
Show the the build history of a docker image. This command displays how an image was created, layer by layer. It shows the layered build steps that created this docker image:
docker history [image-name]
Shows the logs, that the container is producing inside the container (this is the output you would see when you are in the terminal inside the container):
docker logs [container-id]
docker logs [container-name]
The -f or --follow flag shows all the following lines (the new ones):
docker logs -f [container-name]
Only show the last 100 lines of the logs:
docker logs -n 100 [container-name]
Show me the logs (in following mode) of a container whose container-id starts with 7:
docker logs -f 7
Show detailed, low-level information about a docker container. It returns a full JSON configuration dump:
docker inspect [container-id]
Show only the runtime status of this container:
docker inspect [container-id] | jq '.[].State'
Get the terminal of a running container. In this case the bash. With this command, you can get inside of the container. Here, you can navigate through the virtual file system of the container and so on. It could happen, that some containers do not have “bash” installed - in this case use “/bin/sh” instead! Every container has either bash or sh installed! Btw. the flag -it stands for “interactive terminal”.
docker exec -it [container-id] /bin/bash
when you are inside the container, you can run the plain linux command ps aux to show the processes running inside of the container. These processes are the ones that actually keep the container alive. For example the main process is PID 1.
What is a PID? -> This is the process ID of linux. Every process in linux has it’s unique ID.
ℹ️ if you have a “naked” linux container like alpine, you don’t even need exec - in this case -it is sufficient:
docker run -it alpine
alpine is a linux derivative!
Attaching to the container’s main process (useful for interacting with the primary process directly).
ℹ️ This command is rarely used.
docker attach [container-id]
Use the key sequence CTRL-p CTRL-q to detach from a container without stopping it.
What is the difference to docker exec -it?
“exec” runs a new process inside the container (typically used for interactive shells). “attach” connects the terminal to the main process (PID1) live inside the container.
Login to a private repository (Login-Mechanism depends on the type of repository - e.g. Nexus, Artifactory, AWS, …):
docker login
Push an image to a private repository:
docker push [registry]/[repository]:[tag]
This command is renaming a local image. A copy of the image with the new name is created locally.
docker tag [locally-built-image-name] [private-registry-adress]/[repository-name]:[optional-version-tag]
4. Dockerfiles Link to heading
Dockerfiles: Build your own Docker-Images and run them as containers!
- Dockerfile = Blueprint of images
- Dockerfile = A recipe used by Docker to build images
Example of a Dockerfile:
FROM node:14-alpine

WORKDIR /app

COPY package*.json ./

RUN npm install

EXPOSE 3000

CMD ["npm", "start"]
Each Dockerfile instruction that changes the image state (in most cases) creates a new layer in the image.
FROM instruction Link to heading
The FROM instruction specifies the base image you are building your own docker image on. E.g. the application needs node v.14.0.0 to run. Other examples would be:
FROM python:3.11-alpineFROM openjdk:21
You could also use FROM scratch. Docker then creates an image starting from an empty filesystem, without using any base image.
WORKDIR instruction Link to heading
The WORKDIR instruction sets the default working directory inside the image for subsequent instructions during build and also defines the default working directory when a container starts.
⚠️ WORKDIR may, under certain circumstances, create a new layer. It changes into a directory, but if this directory does not exist, it will be created. This results in a new layer.
COPY instruction Link to heading
Moves files from your machine into the image.
COPY [src] [dest]
- [src] = source path (on your host, within the build context)
- [dest] = destination path inside the image (container filesystem)
RUN instruction Link to heading
The RUN instruction executes any linux-commands inside the container when building the image. This creates a new layer in the image.
EXPOSE instruction Link to heading
The EXPOSE instruction documents on which container-port the container is listening. It does not publish the port. It only serves as information for the user of the container. If you run docker run -P, then Docker will publish all exposed container ports on to random host ports.
CMD instruction Link to heading
The CMD instruction defines what command should be executed when the container starts.
Dockerfile at a glance Link to heading
The following picture shows an example of a Dockerfile:
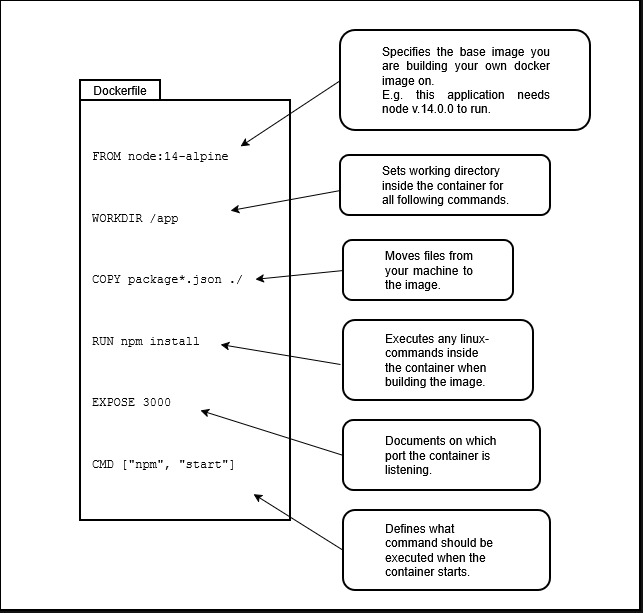
Dockerfile at a glance.
Building an image Link to heading
With this Dockerfile, you can now build an image. To do that, use the following command:
docker build -t myApp .
When executing this command, a container image is built from the Dockerfile. After running the command, the image is stored in the local Docker registry of the machine.
myAppspecifies the name of the image.specifies the build-context.
What is the docker build context? Link to heading
The build context is the directory that Docker uses when building the image. Everything inside it is sent to the Docker daemon. Docker can only copy files from this context into the image (COPY). The Dockerfile must be located within this build context. Therefore, the . can also be seen as the file path to the Dockerfile.
By default docker searches for a file named Dockerfile in the root of the context. You can configure a different file with option -f. Here, you have to specify the path to the Dockerfile you wanna use:
docker build -t myApp -f docker/Dockerfile-prod .
Running the image Link to heading
With the following command, you can then run the docker image. This starts a new container from the image:
docker run -p 8080:80 myApp
- Port outside the container: 8080
- Port inside the container: 80
This container is then reachable via http://localhost:8080.
5. Docker Networking Link to heading
Dockerfiles are great for defining individual containers. But real-world applications rely on multiple containers working together!
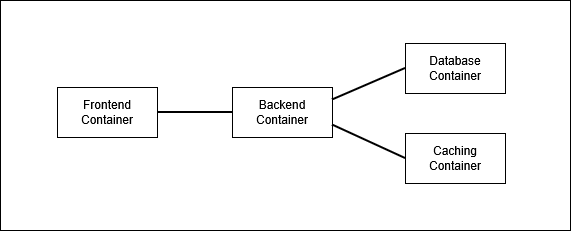
You have multiple containers, that need to communicate with each other!
Docker networking allows containers to run in the same virtual network, that docker creates in order to communicate simply with each other using just the container-name (you don’t need hostname, portnumber, etc.). This is especially important in a microservice-architecture!
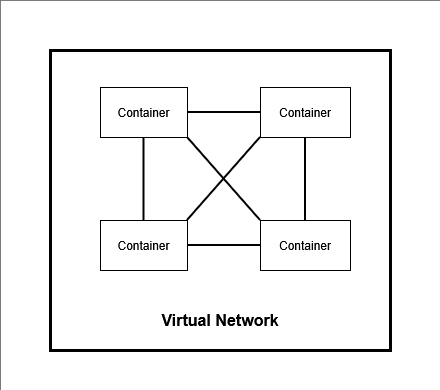
Containers run in the same virtual network to communicate with each other!
Networking-Example: Link to heading
In this example, a Frontend-Container and a Backend-Container in a virtual network have to communicate with each other.
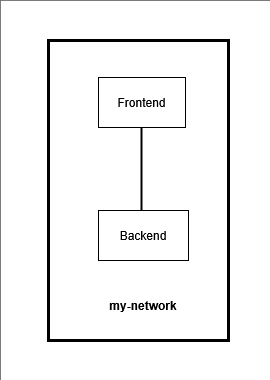
The frontend-container and backend-container are communicating in a virtual network called ‘my-network’.
To create this network, the following commands are necessary:
Step 1: Create a new network
docker network create my-network
Step 2: Run the Backend-Container in the network
docker run -d --name backend --network my-network [my-backend-image]
Step 3: Run the Frontend-Container in the same network
docker run -d --name frontend --network my-network -p 8080:80 [my-frontend-image]
The port forwarding is only needed for the frontend so that you can access it from the host browser.
ℹ️ Kubernetes provides its own networking model, which replaces traditional Docker networking in many deployments. Some people would say: docker networks have become obsolete with the adoption of Kubernetes.
⚠️ Docker containers communicate with each other unencrypted within a Docker network.
6. Docker Compose Link to heading
Typing all those docker commands over and over again can become repetitive and error-prone and in production environment may not be the most optimal to use. This is where the power of Docker Compose comes in!
Define all the services you want to run in a single file and start them with a single Docker command.
Docker Compose allows you to define multiple container configurations that should run in the same network in one place in code.
Docker Compose provides a simple, declarative way to define and orchestrate multi-container applications.
Docker Compose illustrates the transition from “manually typing commands” to “Configuration as Code,” where multiple commands are defined as code in a single file. This is part of the fundamental DevOps practice of “codifying” everything to make things repeatable and consistent. Btw.: Kubernetes uses the same principle of declarative configuration files.
Example of a docker-compose file: Link to heading
We define the configuration for all containers in a single file.
We can then start all of these containers with a simple docker compose up -d command.
To stop and remove everything, you only need to run docker compose down.
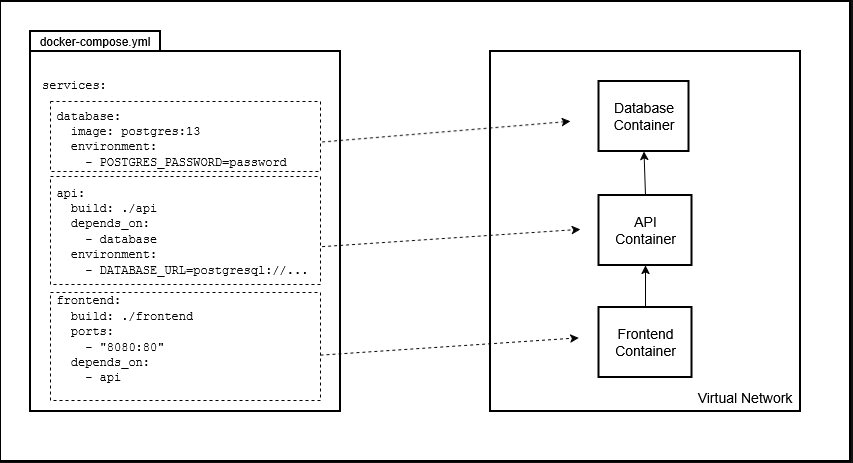
Docker Compose file at a glance.
7. Docker Volumes Link to heading
For example: I start a MySQL-Container and store some data into that database. Then I delete the container and restart it again. Then the data is of course gone because the data is stored inside the container (in the “container file system”).
Docker Containers are “ephemeral”, which means they need to be very easily replacable and you should be able to remove one very simply and create a new one. Containers are designed to be temporary.
Containers = Temporary by Design!
How to ensure, that data is saved/persisted even when containers are destroyed/removed from the host and recreated again?
The Solution: Docker Volumes provide the ability to persist data outside the container (on the host machine). The reference to the data location is then linked to the container.
The following command creates a “Storage-Area” on the host-machine:
docker volume create my-data
To use the volume with a container, execute the following command:
docker run -d --name mysql -v my-data:/var/lib/mysql -e MYSQL_ROOT_PASSWORD=password mysql
This connects the storage-area with a special location inside the container.
The data between the host and the container is mirrored. If the container is deleted and restarted, it can immediately be linked to the volume again and will then regain access to the data. The container is temporary, while the data on the host is permanent.
8. Best Practices for Production Link to heading
The following shows some performance optimizations and security guidelines you should use when working with docker.
Use specific image tags! Link to heading
Do not use the “latest” tag in production! Use specific image-tags instead! You have to explicitly pin the version!
❌ Wrong:
node:latest
✅ Correct:
node:18.17-alpine
Why not use latest?
Because when a new image is available and you run your docker container again, you get a completely new image version and suddenly the application crashes because over night the base image was updated with some breaking changes. The latest tag is just a default tag! It just points to an image, that was named by the maintainer as latest.
⚠️ Always use exact version tags! When you use latest, the image can change anytime without a warning!
Alternatively, you could also use docker image digests:
A Docker image digest is a unique, cryptographic identifier (SHA-256 hash) representing the content of a Docker image. Unlike tags, which can be reused or changed, a digest is immutable and ensures that the exact same image is pulled every time. This guarantees consistency across different environments and deployments.
Layer Collapsing (Combine Run-Commands with &&) Link to heading
Each layer in your image adds an extra weight to your container! This makes your image bigger and slower! Combining related commands makes it lighter, faster and reduces cyber-attack surface because the more unnecessary tools installed in the container, the more stuff is there that hackers can exploit! Take a look at the examples:
❌ Wrong Dockerfile:
FROM debian
RUN apt-get update
RUN apt-get install -y nginx
RUN apt-get clean
Each RUN instruction in the Dockerfile above creates a seperate layer!
✅ Correct Dockerfile:
FROM debian
RUN apt-get update \
&& apt-get install -y nginx \
&& apt-get clean
The Dockerfile above combines related commands with &&
Use multi-stage builds! Link to heading
This can shrink image-sizes dramatically! Sometimes from 1GB down to less than 100MB! It is important to keep the size of your image as small as possible!
Smaller images:
- deploy faster
- cost less to store
- fewer security issues
Example: When building java-based applications, JDK is needed to compile the java source-code. But JDK is not needed to run the java-application itself. In addition, you might be using tools like Maven or Gradle to build the java application. But those tools are also not needed in the final image to run the java application! So how do we separate the build-stage from the runtime-stage? How do we exclude the “build-dependencies” from the final image?
–> For that you can use multi-stage builds!
How do multi-stage builds work?
Docker uses multiple temporary images during the build-process but keeps only the latest image as the final artifact.
Example of a Dockerfile with two build-stages:
FROM maven AS build
WORKDIR /app
COPY myapp /app
RUN mvn package

FROM tomcat
COPY --from=build /app/target/file.war /usr/local/tomcat...
Use multiple FROM-instructions in your dockerfile. Each could use a different base image and each of them begins a new stage. You can copy artifacts from one stage to another, leaving behind everything you don’t want in the final image. The docker container is only based on what comes after the last FROM instruction.
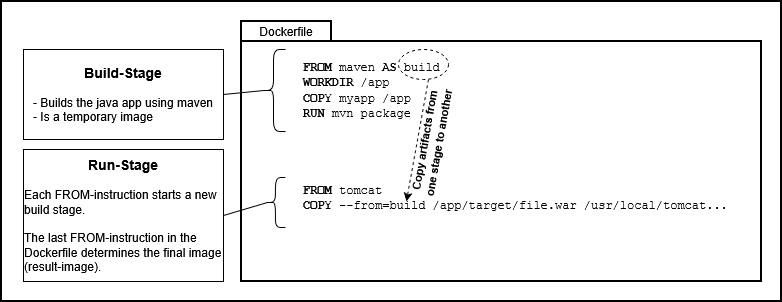
Multi-Stage-Builds at a glance.
Don’t run containers as root! Link to heading
Always add a USER and switch to that user!
❌ Wrong Dockerfiles:
RUN apk add --no-cache curl
or
RUN apk add --no-cache curl
USER root
The snippets above give admin priviliges to all the code inside the container! If a hacker breaks into the container, then the hacker has the key to EVERYTHING!
Instead, create a dedicated user in the dockerfile! This is safe!
✅ Correct Dockerfile:
RUN addgroup -S appgroup && adduser -S appuser -G appgroup
USER appuser
Scan your images regularly for vulnerabilities! Link to heading
There are tools that can run an image security scan in an CI/CD pipeline when building images.
Examples are:
- Docker Scout
- Docker Hub Vulnerability Scanning
- Snyk.io
- Anchore
- Clair
- JFrog Xray
Don’t store any secrets in images! Link to heading
Password, API keys, private keys, etc. must never be part of the Dockerfile! They could be exposed by simply running docker history or using more advanced image inspection tooling.
Remove setuid and setgid permissions Link to heading
Setuid is a special permission in Unix which permits a user to execute certain programs with elevated privileges. When an executable file’s setuid permission is set, users may execute that program with a level of access that matches the user who owns the file.
Linux capabilities Link to heading
Capabilities are attributes in the linux kernel that grant processes that are normally reserved for processed with UID 0.
- CAP_CHOWN: allows to change a file’s UID and GID
- CAP_SETUID: allow usage of setuid features
- CAP_NET_ADMIN: manage network interface configuration
When using Docker, you should remove all unnecessary Linux capabilities for security reasons and grant a container only the minimum required privileges.
docker run -d --cap-drop audit_write app-image
docker run -d --cap-drop all --cap-add setuid app-image
Use .dockerignore files!
Link to heading
Keep the size of your images as small as possible!
- Don’t let unneded files get into your images (i.e.
COPY . /app) - Don’t install unneeded packages
- Choose the smallest base image that fits your needs
Dockerignore-Files are a good way to prevent copying useless files into your image!
The Dockerignore file is important for COPY and ADD instructions in the Dockerfile because it allows you to control which files should be ignored during copying. This is important to keep images small, since unnecessary files and garbage are not copied into the container.
When using the COPY instruction in a Dockerfile, you define the build context. You can exclude specific files from that context by using a .dockerignore file. It lists a set of globs that will not be sent to the docker daemon as part of the context.
As a minimal requirement, you should put .dockerignore and Dockerfile always into the .dockerignore-file! For security-reasons and optimization reasons!
Use the --no-cache flag!
Link to heading
When using apk add in Docker images, you should generally use --no-cache to avoid storing unnecessary package cache files and keep the image smaller.
Example:
RUN apk add --no-cache nginx
Use Layer Caching! Link to heading
Docker reuses old layers if nothing has changed.
Layers build on top of each other. Each layer only contains the changes (delta) compared to the layer below it. This is where layer caching can be utilized.
On subsequent builds, Docker checks whether a layer can be reused from the cache. If so, the cached layer is used and the instruction does not need to be executed again.
Since every layer depends on the layer below it, this means: if the base layer changes, all layers on top of it must also be rebuilt. That is why the order of Dockerfile instructions matters. You should therefore think carefully about which layers change frequently and which remain mostly unchanged.
Example:
❌ Unoptimized Dockerfile:
FROM alpine
COPY src/ /var/www/html
RUN apk add --no-cache nginx
nginx in Alpine will probably not change very often (for example every 3–4 weeks). However, the src directory in the COPY instruction may change many times per hour because rebuilding the application changes those files. Since the layer created by the COPY instruction changes frequently, Docker must also rebuild the RUN layer on top of it. Therefore, if you execute docker build twice in a row with the Dockerfile above, the RUN instruction will also be executed twice.
In the following example, Docker can reuse the first two lines from the cache. Only the layer created by the COPY instruction needs to be rebuilt:
✅ Optimized Dockerfile:
FROM alpine
RUN apk add --no-cache nginx
COPY src/ /var/www/html
9. Orchestration Tools Link to heading
The next stept would be to learn container Orchestration tools like Kubernetes. However this is a topic for another blog article.
Summary Link to heading
I hope this docker learning roadmap gave you a short overview of the topics that are important to learn to understand docker in detail. 😄