Basics Link to heading
This article explains the basics of docker.
What is Docker? Link to heading
Docker is a virtualization software, that makes developing and deploying applications much easier.
Before Docker: Link to heading
Before Docker existed, every developer in the team had to install and configure all required services directly on their operating system (on their local machine). This process was tricky because:
- Installation process differs between operating systems (Mac vs. Windows vs. Linux …).
- Installation process requires many steps where something can go wrong.
After Docker: Link to heading
With Docker, you work with containers. A container is an isolated environment that includes everything a service needs to run.
For example, you can package Postgres DB with a specific version into a container, along with all its dependencies and configuration. You can then start it on your computer with a single run-command:
docker run postgres
The command above fetches a container package from the internet and starts it on your computer.
Advantage of Docker:
- The same commands work across all operating systems.
- The same commands work for all services.
With Docker, the old problem of “It only works on my machine” is gone. Each piece of software runs inside its own container, completely separate from your local system. A container will run the same way everywhere — on your laptop, on a server, or in the cloud. All dependencies (libraries, tools, configurations) are already included inside the container.
Docker containers are like perfectly packed suitcases for your code. Everything you need for the journey is in there. Nothing more and nothing less.
This also avoids version conflicts — for example, if two projects need different versions of Python or Node.js, they can each run in their own container without interfering with each other.
The deployment of docker containers is as simple as “sharing a receipe”!
Docker vs. VMs Link to heading
Do you know virtual machines (VMs)?
A virtual machine (VM) allows you to run an operating system, like Windows, on a different host system, like MacOS:
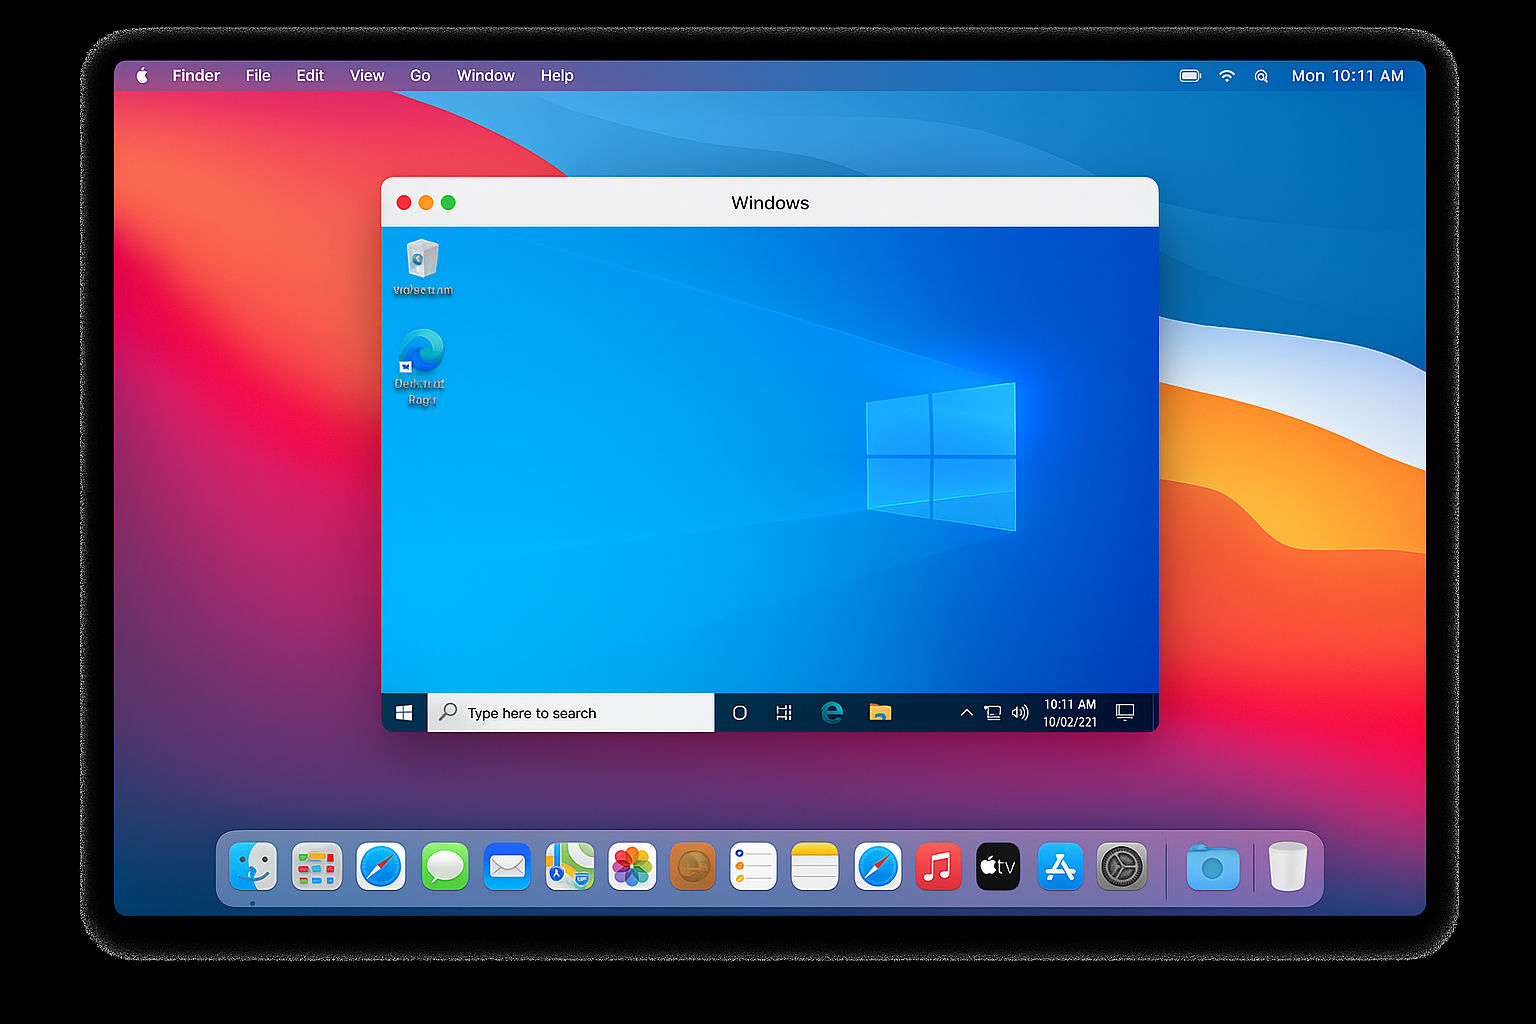
With a virtual machine you can run a Windows OS on MacOS
Docker is similar to a VM — but with some important differences.
Here’s a look at the structure of an operating system:

Architecture of an Operating System
-
Hardware Layer: The actual machine (= “bare metal”) — CPU, memory, storage, network, devices, …
-
OS Application Layer: Where user programs run
-
OS Kernel Layer: Core of the OS — manages processes, memory, drivers, and system calls. The kernel acts as a middleman between hardware and applications. It “interacts” between them.
The difference between docker and a VM is the following:
-
A VM virtualizes the entire OS. It has its own Kernel and its own Application layer.
-
Docker only virtualizes the OS Application Layer. It only has its own Application Layer
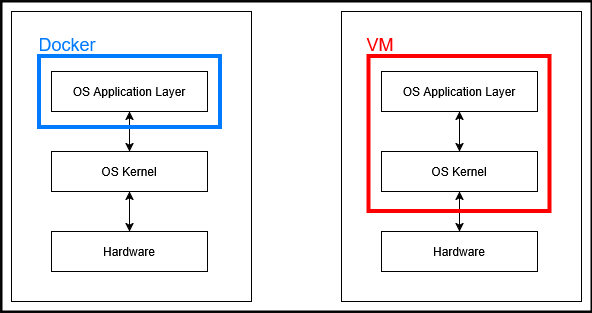
Docker virtualizes only one layer (Application Layer). A VM virtualizes two layers (Application-Layer + Kernel Layer).
Implications:
-
Docker is lighter and uses less disk space because it shares the host OS kernel (it only virtualizes one Layer instead of two).
-
Docker starts faster because it only has to boot one layer instead of two.
Another difference: You can run a Linux VM on a windows machine. You cannot do that with docker. Docker is only compatible with Linux distros.

Linux based docker images cannot use windows kernel
The solution: Docker introduced “Docker Desktop” which uses a “Hypervisor Layer” with a lightweight linux distro to provide a Linux-Kernel for MacOS and Windows.
For local development you have to install the tool Docker Desktop on your mac or windows laptop to run linux based images!
Docker Images Link to heading
A Docker image is an executable artifact. It is immutable!
An image is a snapshot of your software along with all of its dependencies down to the operating system level.
It includes:
- Application source code (e.g., a JavaScript app)
- Dependencies and services (e.g., Node.js, npm)
- OS layer (usually Linux)
- Configuration such as environment variables, directories, and files
Docker images are usually downloaded from DockerHub, making it easy to run applications without manually setting up the environment.
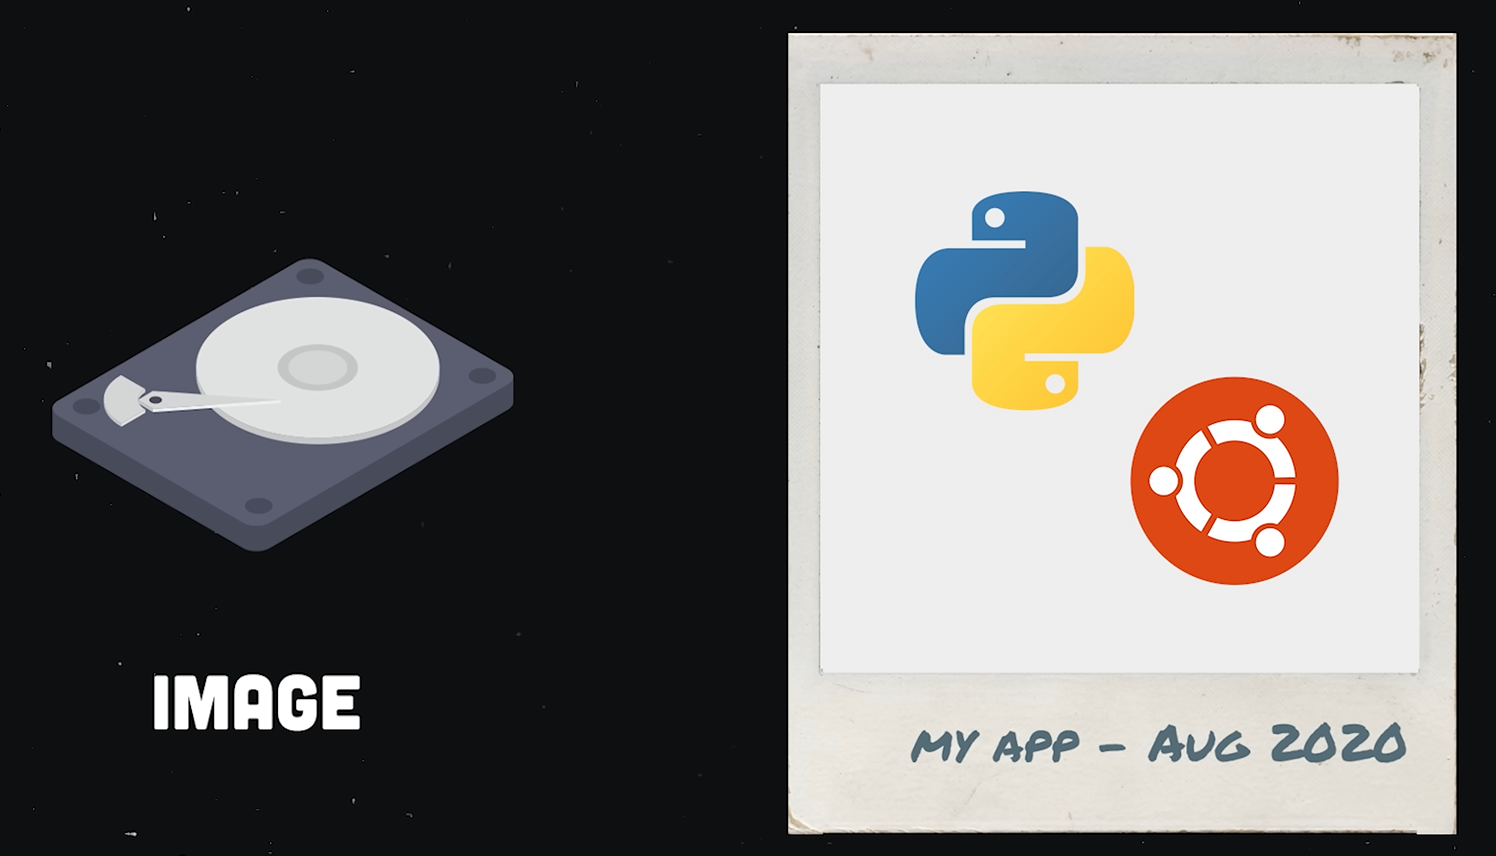
A docker image can be seen as a CD or as a polaroid-snapshot of your application including all of its dependencies!Source:Fireship: Docker in 100 Seconds
Docker Containers Link to heading
We need to start the image somewhere –> in a container!
A container is where a Docker image actually runs.
- A container starts and executes the image/application.
- A container is a running instance of an image.
- You can run multiple containers from the same image at the same time.
Let’s take a look at two commands:
docker images - This command gives you a list of images, that are available locally on your machine.
docker ps - This command gives you a list of containers that are running locally on your machine.
Where do I get my docker images from? -> From Docker Registries (e.g. Docker Hub)
Docker images are versioned. E. g. if you have a MySQL-Image and a new version of MySQL gets published, then also a new version of the MySQL image gets published on DockerHub. Different Versions are identified by image-tags.
ℹ️ The “latest” tag refers to a Docker image that the maintainer has chosen as the default, not necessarily the most recent version.
CD and CD-Player Link to heading
You can think of a Docker-Image like a CD:
The CD is an immutable artifact, that contains all the content you need — the music, album art, and instructions for playing. Similarly, a Docker image contains everything an application needs — code, dependencies, configuration, and the OS layer. A Docker container is like a CD playing in a CD player: The CD itself doesn’t do anything until it’s in the player. Once the CD is in the player, the music starts playing — just like a container runs the application from the image. You can put the same CD in multiple CD players and play it simultaneously, just like you can run multiple containers from the same image.
This analogy makes it easy to see the difference:
- image = static package
- container = running instance

A Docker container is like a CD playing in a CD player, where the CD itself represents a docker image. Source: gpx.com
Pulling and running images Link to heading
How to pull an image? Link to heading
With the following command an image is pulled from a registry:
docker pull [image-name]:[tag]
For example:
docker pull nginx:1.23
The image is then pulled from Docker Hub, because the “Docker Hub” registry is used by default.
How to run an image in a container? Link to heading
This command creates a container from the given image and starts it:
docker run [image-name]:[tag]
For example:
docker run nginx:1.23
ℹ️ Docker generates a random container-name if you do not specify one.
Docker pulls an image automatically, if it does not find it locally. This means: You can skip docker pull entirely. It’s enough to just execute the docker run command.
Running in detached mode Link to heading
You can use the --detach or -d flag to run the container in the background without blocking the terminal.
For example:
docker run -d nginx:1.23
This runs the container in the background and prints the container-id to the terminal.
Logs Link to heading
The following command is used to view logs of the service running inside the container:
docker logs [container-id]
Stop a container Link to heading
The following command stops one running container:
docker stop [container-id]
Multiple running containers can be stopped in this way:
docker stop [container-id] [container-id] [container-id]
Start a container Link to heading
The following command restarts one or more stopped containers:
docker start [container-id]
List all containers Link to heading
docker ps -a
or
docker ps --all
lists all containers (stopped + running)
Assign a name to a container Link to heading
The --name flag assigns a specific name to a container:
docker run --name hello nginx:1.23
Port Binding Link to heading
The application inside the container runs in an isolated Docker network. We need to expose the container port to the host. “Port-Binding” means: Bind the container’s port to the host’s port to make the service available to the “outside world”.
- “Container” = its own small, isolated network
- “Host” = your computer
- “Exposing a port” = allowing external access to the container
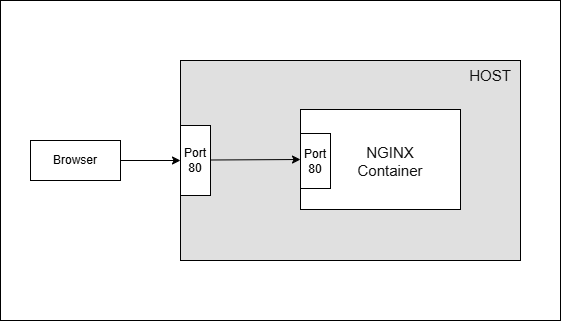
The container’s port must be bound to the host’s port to allow external access to the container
Every container on your host has its own specific port:
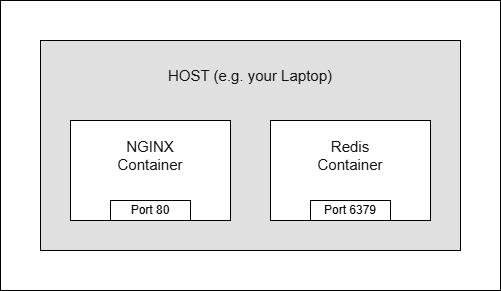
Every container runs on a specific port.
How to configure the port-binding? Link to heading
You can configure the port-binding via -p or --publish flag.
The following command runs an NGINX-Container in detached-mode and publishes the container to the host:
docker run -d -p [host-port]:[container-port] nginx:1.23
For example:
docker run -d -p 9000:80 nginx:1.23
This command means:
“Bind the container-port 80 to the localhost-port 9000, so that I can access the container’s content as if it was running on my localhost port 9000”.
After executing this command, the host-port 9000 is then blocked! Only 1 Service can run on the same port!
The standard is to use the same port on your host as the container is using:
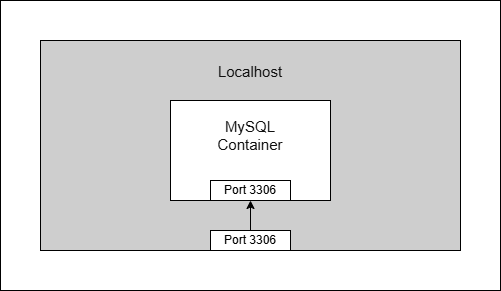
Standard is to use the same port on your host as the container is using
Registries Link to heading
DockerHub is a public Docker Registry. But companies can also use their own private docker registries (e.g. Sonatype Nexus or JFrog Artifactory)
Dockerfile Link to heading
How can I create my own Docker-Image? –> With a Dockerfile!
Use-Case:
I created an application and I want to deploy it as a docker container. To do that, I have to create a “definition” of how to build an image from my application. And this definition is written in a file called Dockerfile. The Dockerfile is a text-document that contains commands to assemble an image. Docker can then build an image by reading those instructions. A Dockerfile has no file-extension. It is convention to name the file always “Dockerfile”.
Structure of a Dockerfile Link to heading
Dockerfiles start from a parent image or “base image” (= mostly a lightweight linux operating system image). The parent image is a docker image that your image is based on. You choose the base image, depending on which tools you need to have available. E. g. for a java application you would use a base image that has the java runtime installed (= a lightweight linux operating system with java installed on top of it).
We define the base image with an instruction which is called “FROM”. Dockerfiles must begin with a FROM instruction. With this, we say: “Build this image from the specified base image!”.
Base images are just like other images. Every image consists of multiple image layers. This makes docker so efficient because image layers can be cached etc.
In the following, you can see an example of a Dockerfile. This Dockerfile creates a docker-image for a node.js application, which can then be started as a container.
FROM node:19-alpine

COPY package.json /app/

COPY src /app/

RUN npm install

CMD ["node", "server.js"]
RUN instruction Link to heading
RUN <any-command>
The RUN instruction executes any command in a shell inside the container-environment.
COPY instruction Link to heading
COPY <src> <dest>
The COPY instruction copies files or directories from <src> and adds them to the filesystem of the container at the path <dest>.
<src>is the path on our machine (host)<dest>is the path inside the container
COPY package.json /app/
The slash at the and of "/app/" is important! It tells docker to create the new directory in the container if it does not exist yet.
While “RUN” is executed in the container, “COPY” is executed on the host.
Normally, the whole application is copied into the container. This copies the whole application source folder to the container:
COPY src /app/
WORKDIR instruction Link to heading
This instruction sets the working directory for all following commands (it is like changing into a directory via cd command).
CMD instruction Link to heading
The RUN instruction is used to execute commands however the last command in the Dockerfile which starts the application inside, we use the instruction “CMD”. CMD is the instruction that is executed when a docker container starts. There can only be one “CMD” instruction in a dockerfile - if multiple CMD instructions are present, only the last one takes effect.
Build an image from a Dockerfile Link to heading
How can we now build the docker image from this dockerfile?
With this command:
docker build [dockerfile-location-path]
For example:
docker build .
In this case the dot (".") means that the dockerfile can be found in “the current location”.
Wit the -t or --tag flag, you can set a name and optionally a tag in the format name:tag:
docker build -t nodeapp:1.0 .
In the command above, the image-name is nodeapp with the tag 1.0
If you run
docker images
afterwards, you can see the newly built image in the list. You can then run this image to start the container.
Conclusion Link to heading
I hope you liked this simple introduction in docker and learned something new. However knowing these concepts only in theory is not enough. Deepen your knowledge in a practical way by dockerizing an application you developed yourself! 😄